Sunday, November 6, 2011

Chocolate Caramel Cake


             I had some spare time this weekend (after a horribly busy week at school), so I decided to relax and make some cake. Decided to bake my favorite chocolate cake recipe, whip up some chocolate buttercream frosting, and then top everything off with a batch of caramel sauce. To say the least, it was amazing! Very rich though, so it was eaten in moderation. I have never made caramel sauce before so it was a new experience for me. A lesson was learned about the temperature of cooking it at. I also liked how the pictures turned out.

Here's the recipe:

Chocolate cake: refer to recipe for my Chocaroon cake


Chocolate Buttercream Frosting:
 Ingredients:

  • 2 cups shortening
  • 8 cups confectioners' sugar
  • 1/2 teaspoon salt
  • 2 teaspoons vanilla extract
  • 1 cup heavy whipping cream

  • Directions
  1. In a mixing bowl, cream shortening until fluffy. Add sugar, and continue creaming until well blended.
  2. Add salt, vanilla, and 6 ounces whipping cream. Blend on low speed until moistened. Add additional 2 ounces cream if necessary. Beat at high speed until frosting is fluffy.

Caramel Topping:

Ingredients:

  • 1 1/2 cups sugar
  • 1/3 cup water
  • 1 1/4 to 1 1/2 cups heavy cream
  • 1/2 vanilla bean or 1/2 teaspoon pure vanilla extract

Directions

1.Mix the water and sugar in a large heavy-bottomed saucepan. 
2.Cover and cook over low heat until the sugar dissolves. Increase the heat and boil uncovered until the sugar turns a medium brown, about 5 to 7 minutes, stirring occasionally with a wooden spoon. Watch it carefully at the end, as it will go from caramel to burnt very quickly. Stand back to avoid splattering, and gradually add the cream and the seeds scraped from the vanilla bean (or vanilla extract). 
3.Simmer until the caramel dissolves and the sauce is smooth and thick, about 2 minutes. Serve warm, or add another 1/4 cup of heavy cream and serve room temperature.


Sunday, October 23, 2011

Cake Pops


Quick post about some cake pops I made and brought to school for people. These are simple to make but require lots of time and patience. I made 2 kinds: chocolate cake with chocolate frosting, and yellow cake with vanilla frosting. Both covered in a chocolate coating and topped with sprinkles. Very pretty end product, but very time-consuming.

Here is the basic recipe for cake balls/pops that can be adapted in many ways: http://allrecipes.com/recipe/cake-balls/detail.aspx


Basic Recipe:

Ingredients:

  • 1 (18.25 ounce) package chocolate cake mix
  • 1 (16 ounce) container prepared chocolate frosting
  • 1 (3 ounce) bar chocolate flavored confectioners coating

Directions

1.Prepare the cake mix according to package directions using any of the recommended pan sizes. When cake is done, crumble while warm into a large bowl, and stir in the frosting until well blended.
2.Melt chocolate coating in a glass bowl in the microwave, or in a metal bowl over a pan of simmering water, stirring occasionally until smooth.
3.Use a melon baller or small scoop to form balls of the chocolate cake mixture. Dip the balls in chocolate using a toothpick or fork to hold them. Place on waxed paper to set.

Pumpkin Whoopie Pies with Maple Cream Cheese Filling

It's officially been Fall for a month now. My favorite time of the year for many reasons, one being the food. I love pumpkin and was excited when I found a great recipe for some whoopie pies. They were incredibly easy to make and made my house smell amazing while they were baking. I was a bit concerned about they pies turning out too dry, but as you can tell from the picture above, they actually were a bit too moist after sitting for a bit. I put them in the fridge because I thought the filling would firm up a bit that way, but it also made the cake a bit too moist. 

I used this recipe and followed the directions exactly. 

Whoopie Pies ingredients:
3 cups all-purpose flour
2 tablespoons cinnamon
1 teaspoon baking powder
1 teaspoon baking soda
1 teaspoon salt
1 teaspoon ground ginger
½ teaspoon ground nutmeg
1 cup granulated sugar
1 cup dark brown sugar
1 cup canola or vegetable oil
3 cups chilled pumpkin puree (canned pumpkin)
2 eggs
1 teaspoon vanilla extract
 Maple-Cream Cheese Filling ingredients:
3 cups powdered sugar
8 ounces cream cheese, at room temperature
4 ounces (½ cup) unsalted butter, at room temperature
3 tablespoons maple syrup
1 teaspoon vanilla extract
Directions:
1. Preheat oven to 350 degrees F. Line baking sheets with parchment paper or a silicone baking mat.
2. In a large bowl, whisk together the flour, cinnamon, baking powder, baking soda, salt, ginger and nutmeg. Set aside.
3. In a separate bowl, whisk the granulated sugar, the dark brown sugar, and the oil together. Add the pumpkin puree and whisk to combine thoroughly. Add the eggs and vanilla and whisk until combined.
4. Gradually add the flour mixture to the pumpkin mixture and whisk until completely combined.
5. Use a small cookie scoop or a large spoon to drop a rounded, heaping tablespoon of the dough onto the prepared baking sheets, about 1 inch apart.
6. Bake for 10 to 12 minutes, making sure that the cookies are just starting to crack on top and a toothpick inserted into the center of a cookie comes out clean. The cookies should be firm when touched. Remove from the oven and let the cookies cool completely on a cooling rack.
7. To make the filling, beat the butter on medium speed until smooth with no visible lumps, about 3 minutes. Add the cream cheese and beat until smooth and combined, about 2 minutes. Add the powdered sugar a little at a time, then add the maple syrup and vanilla and beat until smooth.
8. To assemble the whoopie pies: Turn half of the cooled cookies upside down. Pipe or spoon the filling (about a tablespoon) onto that half. Place another cookie, flat side down, on top of the filling. Press down slightly so that the filling spread to the edges of the cookie. Repeat until all the cookies are used. Put the whoopie pies in the refrigerator for about 30 minutes to firm before serving.

Wednesday, August 31, 2011

Twix Bars


I made these a few days after I made the whoopie pies, but I felt like I should create a new post to keep some organization. These were really fun to make and pretty easy too. They tasted amazing, and the only thing I could have done better was make the shortbread thicker, and the caramel filling thinner. It was a bit overwhelming with all the layers, so I made sure to cut the bars into fairly small pieces. If I could redo them, I might have tried to dip the bars in chocolate instead of just doing one layer so it would be more similar to a real Twix bar. 

I cannot find the recipe I used for this dessert, so I'm just going to link to another recipe that is similar to the one that I used. [Link]. This one dipped the pieces into chocolate to make it similar to real Twix bars, and I would highly suggest making it that way, because they are probably a lot easier to eat. 

Whoopie Pies


          I felt in the mood to make something different, so I looked up some desserts on Allrecipe.com and found one for whoopie pies that had good reviews and nice looking pictures. I made the dessert exactly how the recipe specified and they came out amazing. The only thing that I could have done was kept a better eye on them while they were in the oven. I left them in for a bit too long, so they came out a bit dry. They were really easy to make, and didn't take too long to assemble. All photos were taken by myself as well. 

Recipe source here: Allrecipes

Ingredients
  • 1 cup shortening
  • 2 cups white sugar
  • 2 eggs
  • 2 teaspoons vanilla extract
  • 1 cup sour milk
  • 2 teaspoons baking soda
  • 1 cup hot water
  • 4 cups all-purpose flour
  • 1 cup unsweetened cocoa powder
  • 1 teaspoon salt
  •  
  • 1 1/2 cups shortening
  • 4 cups confectioners' sugar
  • 1/4 cup all-purpose flour
  • 1/4 cup milk
  • 1 1/2 tablespoons vanilla extract
  • 2 egg whites, beaten

Directions

  1. Preheat the oven to 400 degrees F (200 degrees C). Grease cookie sheets.
  2. In a large bowl, cream together 1 cup of shortening and white sugar until light and fluffy. Beat in the eggs one at a time then stir in the vanilla and sour milk. Combine the flour, cocoa and salt, stir into the creamed mixture. Stir together the baking soda and hot water then mix them into the batter last. Drop by tablespoonfuls onto the prepared cookie sheet.
  3. Bake for 8 minutes in the preheated oven, until firm but not overbaked. Allow cookies to cool on baking sheets for a few minutes before removing to wire racks to cool completely.
  4. To make the filling: In a medium bowl, cream together the 1 1/2 cups shortening with the confectioners' sugar and 1/4 cup of flour until light and fluffy. Gradually beat in the milk and vanilla until well mixed, then fold in the egg whites. Sandwich at least 1 tablespoon of filling between the flat sides of two cookies.


Sunday, March 13, 2011

Coconut Desserts

I had some extra time this past weekend and decided to bake some treats that involved coconut. The first being a chocaroon cake and the second being homemade Girl Scout Samoa cookies. Both took a lot of time and effort, but it was worth it in the end. I definitely learned some helpful tips by the end as well.

Chocaroon Cake

 For the inspiration of the Chocaroon (also known as the Chocolate Macaroon) Cake, I used this recipe: Chocaroon Cake Recipe. From this I used the recipe for the filling, and for the cake I used my favorite cake recipe: Elizabeth's Extreme Chocolate Lover's Cake Recipe.
  

Cake Ingredients: 

2 1/4 cups all-purpose flour
2 teaspoons baking soda
1/2 teaspoon salt
6 (1 ounce) squares unsweetened chocolate, chopped
1/2 cup unsalted butter
2 1/2 cups dark brown sugar
3 eggs
1 1/2 tablespoons vanilla extract
1 cup sour cream
1 cup water

Coconut Filling Ingredients:
2 egg whites 
1 pinch salt
1/3 cup white sugar
2 tablespoons all-purpose flour
1 3/4 cups flaked coconut
 
 Recipe:
  1. Preheat oven to 350 degrees F (175 degrees C). Grease and flour 2 (9 inch) pans. Sift together the flour, baking soda and salt. Set aside. In the top of a double boiler, heat 6 ounces chocolate, stirring occasionally, until chocolate is melted and smooth. Remove from heat and allow to cool to lukewarm.
  2. In a large bowl, cream together the butter and brown sugar until light and fluffy. Beat in the eggs one at a time, then stir in 1 1/2 teaspoon vanilla. Stir in the melted chocolate. Beat in the flour mixture alternately with the sour cream. Stir in boiling water (batter will be thin). Pour 2/3 the batter evenly into a prepared bundt pan. 
  3. Beat egg white with salt until foamy. Gradually add sugar, and continue beating until mixture forms stiff shiny peaks. Blend in flour and coconut.
  4.  Spoon the coconut mixture evenly onto the cake batter. Pour on the remaining cake batter evenly.
  5. Bake in the preheated oven for 35 to 40 minutes, or until a toothpick inserted into the center of the cake comes out clean. Let cool in pan for 10 minutes, then turn out onto a wire rack and cool completely. 

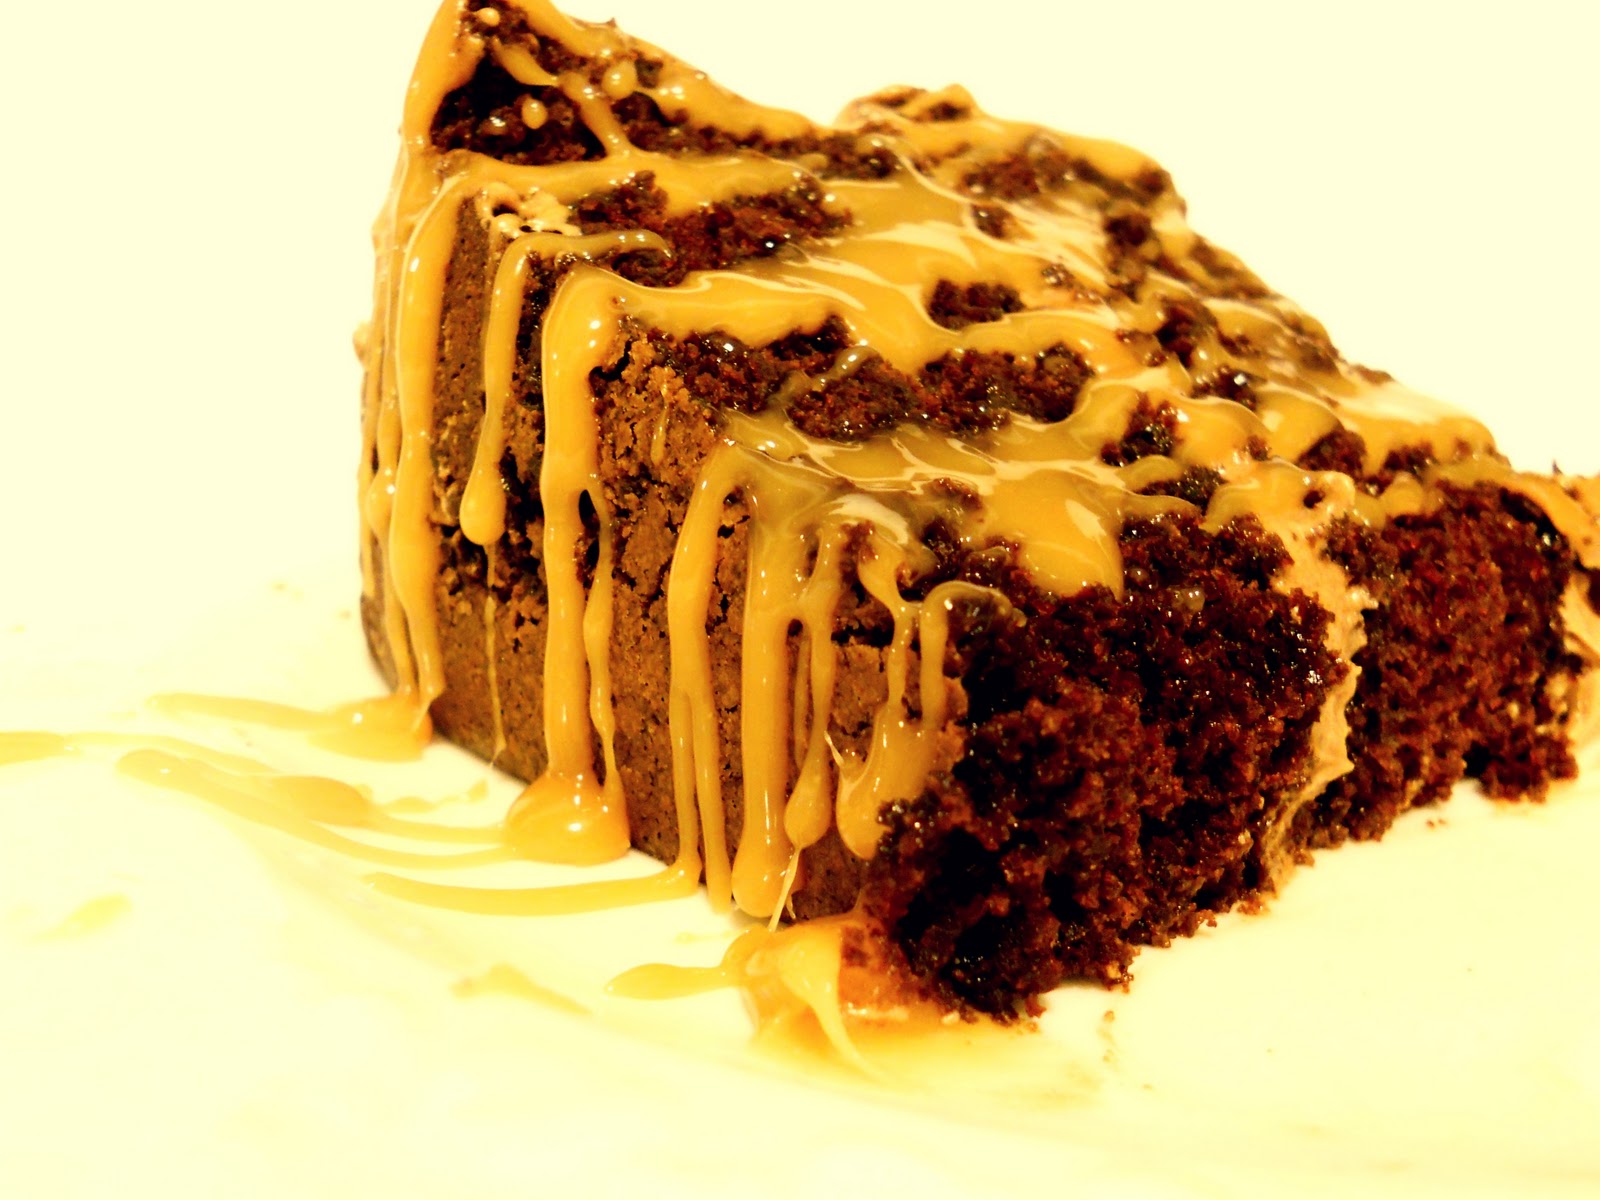
 I decided to made a chocolate ganache to pour over the cake as well which added more richness to it. 

Homemade Girl Scout Samoa Cookies
 
 For this recipe, I combined the cookie recipe from one website:Cookie Recipe with the topping from another website: Topping Recipe. Although they are not a perfect match for the real thing, I think they turned out really well. 
Cookies Ingredients
1 cup butter, soft
1/2 cup sugar
2 cups all purpose flour
1/4 tsp baking powder
1/2 tsp salt
1/2 tsp vanilla extract
up to 2 tbsp milk 
6 tablespoons butter  
1/2 cup granulated sugar
 1/2 cup light corn syrup 
1/2 cup sweetened condensed milk
 1/2 teaspoon vanilla 
4 cups toasted coconut
 
Recipe:
 
1. In the bowl of an electric mixer fitted with the paddle attachment, cream together butter and sugar. Beat until light and fluffy. Add in egg and beat until well incorporated, scraping down the bowl, if necessary. Add in vanilla. Beat until smooth. With mixer on low, add in salt and flour. Mix until completely incorporated and dough is uniform. Roll out dough between parchment paper to about 1/4 of an inch thickness. Freeze for at least 15 minutes.
2. Preheat oven to 350 degrees. Cut out circle pieces with a cookie cutter. Use a smaller circle cookie cutter to cut a hole in the middle or you can use a knife. Bake for 8 minutes, or until crisp. Let cool completely.
3.In a 2 quart saucepan over medium-low heat, combine butter, sugar and corn syrup.
4.Heat to a full boil, stirring constantly with a wooden spoon. Boil for 3 minutes, stirring constantly.
5.Slowly pour in Eagle Brand milk, stirring constantly. Continue cooking over low heat until candy thermometer reaches 220-228 degrees.
6.Remove from heat and stir in vanilla. Beat until creamy. Immediately stir in toasted coconut and mix well.
7.Spoon by tablespoonfuls onto the cookies. Flatten with a spoon.
8.Cool completely.9. Melt chocolate in a microwave safe bowl in 30 second intervals, stirring well after each interval, until fully melted. Place the caramel coated cookies in the chocolate. Use a fork to pull them out of the chocolate and place them on a parchment line cookie sheet. Use the chocolate still on the fork to drizzle stripes over the top of the cookies. Refrigerate until set.


Sunday, January 16, 2011

Double Chocolate Chip Cookies

  I wanted to bake something and decided to go with chocolate cookies with both white and semisweet chocolate chips. They were easy and quick to make. They took about 20 minutes actually making the dough and forming the individual cookies. I unintentionally made them larger and flatter than I thought they would be, but they still tasted delicious.
      
       Recipe:

  •  1 cup butter, softened
  • 1 1/2 cups white sugar
  • 2 eggs
  • 2 teaspoons vanilla extract
  • 2 cups all-purpose flour
  • 2/3 cup cocoa powder
  • 3/4 teaspoon baking soda
  • 1/4 teaspoon salt
  • 2 cups semisweet chocolate chips/ white chocolate chips
  1. Preheat oven to 350 degrees F (175 degrees C).
  2. In large bowl, beat butter, sugar, eggs, and vanilla until light and fluffy. Combine the flour, cocoa, baking soda, and salt; stir into the butter mixture until well blended. Mix in the chocolate chips. Drop by rounded teaspoonfuls onto ungreased cookie sheets.
  3. Bake for 8 to 10 minutes in the preheated oven, or just until set. Cool slightly on the cookie sheets before transferring to wire racks to cool completely. 
Recipe source: Chocolate Chocolate Chip Cookies I